In The Lab: Which 3D Scanning Accessory Produced The Best Result When Scanning Challenging Surfaces?
Aug 18, 2022
Are you having difficulties 3D scanning challenging surfaces that are:
-

Shiny (metal or reflective materials)
-

Dark
-

Thin
-

Areas of high contrast (light and dark colors at the same time)
Optical 3D scanners produce very accurate 3D replicas of objects in the real world. While these 3D scanners are great at capturing most surfaces, occasionally, they will struggle to scan certain types of materials. That’s because the light source projected out of a 3D scanner becomes distorted when it hits a challenging surface. This interference impedes the device from taking the ideal image for creating the 3D scan.
Similar to wearing eyeglasses to improve impaired vision, the good news is there are 3D scanning accessories you can use to help the 3D scanner “see” better in order to capture amazing scans.

Did You Read Our Staff’s Pick: A Guide to the Best 3D Scanning Accessories?
In the previous article, A Guide to the Best 3D Scanning Accessories, we listed the tools we use in our lab—from speeding up the 3D scanning workflow, to better fixturing your parts, and improving scan alignment during post-processing.
In this follow-up article, we’ll show you how we use these tools in our lab. We’ll also run a couple of tests to see which 3D scanning accessory yield the best scanning results.
Prefer To Watch a Video Instead?
Check out the video version of this article you can watch here:
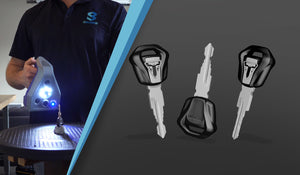
The Subject of the Test

For this test, we’ll be using a metal key as our scan subject.
Here are the reasons why we chose a key for our test:
- It has areas of high contrast (both dark and light surfaces appearing in an object). The head of the key is dark while the blade is light-colored.
- The key has a metal component which can be tricky for a 3D scanner to scan. Metallic surfaces bounce and scatter the light, which makes it difficult for the system to capture in this less ideal condition.
- The blade of the key is thin.
Test Variables
- Scan as we normally do during optimal conditions (the controlled condition): Scan one side. Then flip the object to the other side and scan.
- Improve the 3D scanning path: Position the object in a way that more surfaces can be scanned in one session.
- Increase texture with more reference materials surrounding the object: By spraying a thin coating of 3D scanning spray as well as adding color stickers and dots onto the turntable, this creates more texture for the scanner to track and helps with scan alignment.
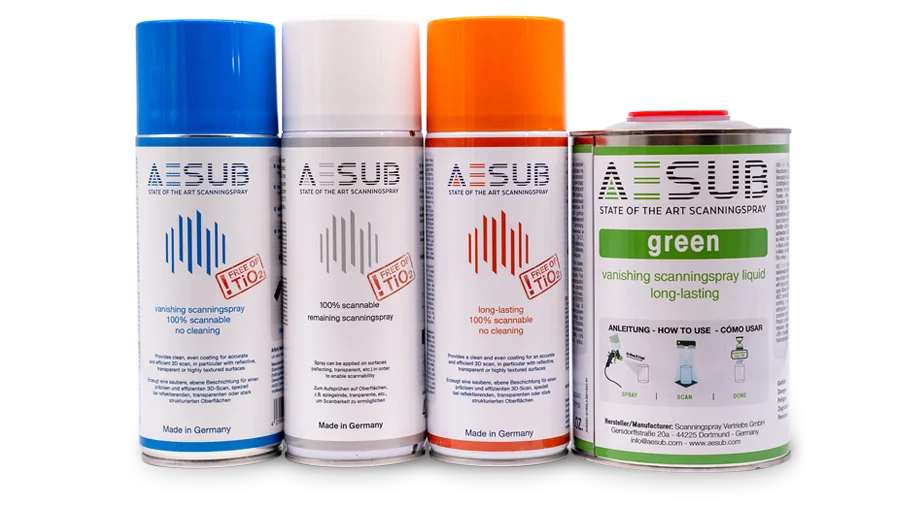
- Improve the surface quality of the object: Finally, we used AESUB Orange 3D scanning spray and applied it directly onto the key. Coating an object with a uniform matte finish creates better surface conditions for an optical 3D scanner to capture. The best part about this spray is that it vanishes in approximately 24 hours. It's especially great for objects that cannot be cleaned.
What do we mean when we talk about texture in 3D scanning?
When we refer to texture in 3D scanning, it just means the color information in the scans. A 3D scanner like the Artec Space Spider 3D scanner uses multiple cameras in a scanning session. Some capture images in full color, those are the texture frames. Others capture the pattern of light projected from the scanner’s built-in projector to the object you are scanning, these are for extracting 3D geometry. The combination of 3D information, as well as the 2D color (texture) images, help the software recreate an accurate 3D replica of the object.
It’s similar to matching puzzle pieces together. The colors and patterns indicate which scan frames should be adjacent to each other. If we add more texture surrounding the object we’re scanning, it helps the scanner figure out positioning to produce better quality scans.
3 Factors that Remain the Same Throughout Our Test
We kept these three things consistent in all the variations of our test:
-

We use putty to secure the key into place.
We find putty is moldable so it’s a quick way to fixture objects such as this key.
-

We used a turntable for 3D scanning.
The turntable increases the reference texture surrounding the object. It helps improve the alignment of the scans during the post-processing stage. The turntable has a larger textured surface when compared to the key, which is a relatively small object to scan. The geometry on the rotary table will help with scan alignment during the processing stage.
-

We used the Artec Space Spider to capture scan data.
This metrology-grade, handheld 3D scanner is great for handling smaller objects like the key.
Test #1 Scan As Normal

In typical scenarios when the conditions are ideal, we would scan one side of the object and then flip it to scan the underside. This is what we did for Test #1.
Here, we captured three of the four sides in one scan which should produce a more accurate alignment between multiple scans. Once we captured all the areas we needed, we flipped the object and scanned the side we didn’t scan the first time around. During the post-processing stage, we aligned the two scans and merged them together into one 3D model.
3D Scanning Tip
The goal is to try and hold the 3D scanner at an equal distance away from the object while rotating the turntable. We’re attempting to capture the object as much as possible in the first round and then we go back and capture the details that we might have missed.
Results

As expected, 3D scanning the conventional way didn’t produce great results because the key has a lot of challenging surfaces that are difficult to capture without any surface treatment. There’s also not enough information overlapping from one scan to the other to help align the scan data together. The details of the blade are mostly lost. These scans did not represent the true thickness of the key.
Let’s test out the other ways in which we can improve our scan results.
Test #2 Improve 3D Scanning Path

This time, we placed the key in an upright position to see if scanning the entire key in one session will improve the scan results.
Results

Test #2 produced better results than Test #1. You can start to see the details of the Triumph logomark and logotype on both sides. The blade is a more accurate representation of the key when you compare the results to Test #1, in terms of its thickness as well as the notches and the teeth.
Let’s take a look at Test #3 and see if we can produce even better results.
Test #3 Increase Reference Texture

We increased the texture of the turntable by affixing dots, colored tape, and 3D scanning spray. In theory, by increasing the color and texture in the scans, we are adding more features to help the 3D scanner with scan registration, so the quality of the scans should improve.
Results

Test #3 provided even better results with a more accurate representation of the key including the details. The logos on both sides are sharper (you can see the word Triumph). The teeth also have sharper definitions.
Let’s take a look at our last test with the 3D scanning spray.
Test #4 Improve Surface Consistency with 3D Scanning Spray

In this scenario, we used a 3D scanning spray (AESUB Orange) directly on the object to add a uniform coating to the key before scanning with the Artec Space Spider handheld 3D scanner.
Results

Using the scanning spray, the 3D scanner was able to pick up the challenging surfaces much better than other variations of our test. It produced the sharpest, cleanest, and most accurate results.
Comparing the Results
As you can see from our test, using a 3D scanning spray like AESUB Orange (Test #4) gave us the best 3D scanning results.
- It gave us the most accurate representation of the physical object
- It provided the highest resolution
- It produced the fewest error on the scans

Here are some side-by-side comparisons so we can take a better look at the results:


Why does 3D scanning spray work the best?
The 3D scanning spray reduces the shine on the challenging surfaces and gives us an optimal surface to scan (a consistent matte white surface). In most of our tests, we’ve found that disappearing scanning sprays are a quick and easy solution to creating ideal 3D scans.
Although we didn’t cover it in this article, clear objects can also benefit from the use of 3D scanning sprays because it creates a barrier for the projected light of the scanner to capture.
-

Transparent Surfaces
Projected light from the 3D scanner goes through the object. The 3D scanner has a difficult time capturing scans because of this scanning condition.
-

Challenging Surfaces With 3D Scanning Spray
A light coating of a 3D scanning spray creates a thin barrier to the object so the 3D scanner can “see” the surface better.
A Complete 3D Model of the Key
For the last 3 tests, we only scanned the difficult to scan portion of the key. We can always go back to scan the top of the key to get a complete 3D model for each test.
To show you the best 3D model we can achieve, we went back and did a complete scan of the key using AESUB Orange 3D scanning spray. Interact with the 3D model on Sketchfab →

Final Takeaways
After completing our tests, these are our findings:
Takeaway #1: Using a 3D scanning spray produced the best results in our tests
In this test, we used AESUB Orange which is a revolutionary 3D scanning spray that disappears without a trace within 24 hours. No cleaning is required. There is often a question of whether adding a 3D scanning spray will affect the accuracy of the scans. We did another test to find out the answer to this question.
The conclusion we’ve come to is while the 3D scanning spray increases thickness by 8-15 microns (as stated on AESUB Blue's technical datasheet), the uniformity produced by the coating will produce a truer representation of the physical part (accuracy) as opposed to not treating the part with a spray at all. Another factor to consider is that typically you don’t need to apply a lot of sprays to coat the part in order to get great scans. The less you spray, the less the thickness of the coating.

There are different types of 3D scanning sprays available that might be more suited for your application. For example, AESUB White is a semi-permanent spray that is ideal for projects when you want to have more control over the coating. You can wipe it off after usage. For large-scale applications like a car or a boat, AESUB Green is a better solution.

Takeway #2: Use the right tools for the job
For this test, we scanned a small object, so the Artec Space Spider was an appropriate tool for the job. We also used a textured turntable and clay to secure the key and to provide reference material, which resulted in better scan registration and accuracy. We believe it’s worth exploring when to use these tools, as you can see from our results.
We only used one scanner, the Artec Space Spider, throughout our test for the sake of consistency. However, we plan to do another test in the future using the Artec Micro to compare the results between these two scanners. Both are good tools for scanning small objects, but the Micro is made for scanning even smaller objects.

The Artec Micro would produce even better results because:
- It’s a desktop 3D scanner that has better technical specifications (higher resolution and accuracy).
- It’s an automated device that eliminates the human error in the 3D scanning process.
- It’s better at 3D scanning smaller objects than the Artec Space Spider because it tracks the position of the object through the automated turntable.
Using the right 3D scanner for the job can make all the difference between getting amazing results versus getting poor scan data as we’ve concluded in the article, Which 3D Scanner Is The Best For Scanning Small Objects.
Choosing whether to use the Artec Space Spider or the Artec Micro really depends on your application. For example, if you need more of the fine details (i.e. scratch marks) for Forensics applications, then you could use the Micro. If you just need to get the overall details of the key, then the Space Spider is still a great option.
Takeaway #3: Mastering a skill like 3D scanning takes practice
As you can see from our test results, we used the same scanner for all our tests, but the outcome can be drastically different.
As with any skill, the more you practice, the better you will be at it. Mastering the art of 3D scanning takes time and gets better with experience. Our hope is that by sharing these test results with you, it will help save you time and give you a better understanding of which 3D scanning accessories will help you get the best results.

